Introduction
The Decorator pattern can be used to dynamically alter or add functionality to existing classes. This pattern is oftern more efficient than subclassing because it relieves us of the need of defining a new object.
So, what does it look like?
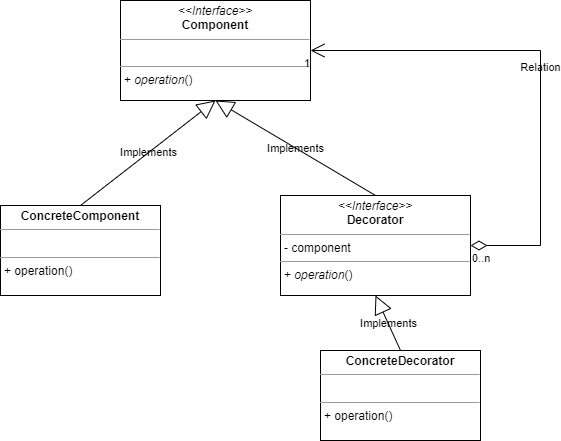
To decorate a certain class the following steps must be taken:
- Construct a subclass, or in our case an implementation of the interface you want to decorate.
- In the Decorator class, make sure you add a reference to the original class.
- Also in constructor of the Decorator class, make sure to pass a reference to the original class to the constructor.
- Where needed, forward all requests to methods in the original class.
- And where needed, change the behaviour of the rest.
This all works because both the Decorator and the original class implement the same interface.
Implementation in Go
The implementation in Go is quite straightforward in this simple example.
Open your commandline or terminal in an empty directory and type:
go mod init github.com/go_decoratorNext open your favourite IDE and add a main.go file. Start by adding these two preliminaries:
package main

import "fmt"
First let us define the Component interface:
type Component interface {
	Operation() string
}
For simplicity, there is only one method in this interface.
Next we need a ConcreteComponent to implement this interface:
type ConcreteComponent struct{}

func (c *ConcreteComponent) Operation() string {
	return "ConcreteComponent operation, "
}
As you can see this is also quite simple, the Operation() method just returns a fixed string.
In this simple example, the Decorator struct is also very simple:
type Decorator struct {
	Component
}
As I wrote in the introduction, the Decorator “wraps” the component in order to alter its behaviour or even add new behaviour.
Time to define some decorators:
type ConcreteDecoratorA struct {
	component Component
}

func (d *ConcreteDecoratorA) Operation() string {
	result := "ConcreteDecoratorA operation, "
	result += d.component.Operation()
	result += "ConcreteDecoratorA behaviour, "
	return result
}

type ConcreteDecoratorB struct {
	component Component
}

func (d *ConcreteDecoratorB) Operation() string {
	result := "ConcreteDecoratorB operation, "
	result += d.component.Operation()
	result += "ConcreteDecoratorB behaviour"
	return result
}
Some notes:
- Both concrete implementation have a reference to the wrapped component.
- The behaviour of the Operation() method is altered. The method is also called on the wrapped or decorated component this method. It is this that we call decorating
Time to test:
func main() {
	component := &ConcreteComponent{}
	decoratorA := &ConcreteDecoratorA{component}
	decoratorB := &ConcreteDecoratorB{decoratorA}
	fmt.Println(decoratorB.Operation())
}
Line by line:
- We create a ConcreteComponent
- We wrap this in a Decorator
- Then we wrap the Decorator in another Decorator. We can do this because both decorators implement the Component interface.
- Then we call the Operation() method on the second Decorator., We can do this because, again, the Decorators implement the same interface as Component.
- We print the result.
Conclusion
As you can see, the Decorator pattern is an easy way to either dynamically or statically change or add behaviour to objects. In many cases it is more flexible than subclassing. Go, of course doesn’t have subclasses in the strict OOP sense.
Use cases could include for example be adding behaviour to flyweight objects or logging.